Traverse Report
Main Menu | Survey Tools | Traverse Report
Use this to compute a traverse closure based on traverse points you've measured and recorded. The traverse report scans your raw file for traverse records, which appear with a TR record type. You can save your shot as a TR record by choosing the TR button when the Measurement Info screen appears. TR records are also useful when you use the Setup Occupy Point function because your last TR shot will now become the current setup point and the BS point will be set to the last setup point for you automatically.
You can also balance your traverse using an angle, compass and vertical balance routine. See the Traverse Adjustment topic for more information.
The following examples will show you the traverse scenarios that FieldGenius supports. The open triangles depict known or computed points. TR records indicate all the foresight shots that were measured and recorded, and the OC record indicate the points that were occupied. Finally, the BK record indicates the point that was used for the initial backsight.

Traverse Definition (Foresight Method)
If we use CASE 1 as an example the user first setup on point 1 and backsighted point 2. He then foresighted and setup on points 3 to 5 and closed the traverse by recording one more TR record to point 6. To compute the traverse report you go to the Main Menu / Survey and choose the Traverse Report button. When selected, you will see the following screen.
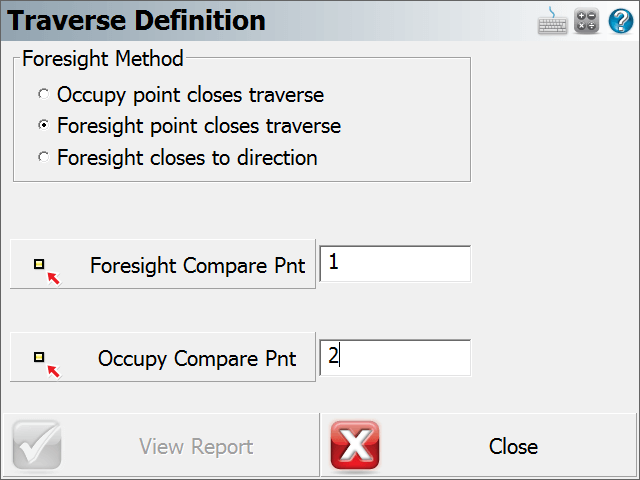
FieldGenius will automatically scan the raw file looking for the last TR foresight and the OC record that was used to measure the last foresight. It will then search for any point within a 3 meter radius and use it as the match or point that defines the original coordinates.
If more than one point is found in the 3 meter radius, it will use the one that is closest.
FieldGenius supports two closed traverse methods. Choose Foresight Point Closes Traverse if you want to do a "Text Book" traverse closure. If you choose the Occupy Point Closes Traverse method, FieldGenius will not use your last foresight observation and assumes that the original backsight and occupy points are fixed. Choosing this method will close the traverse on the original backsight point, not the original setup point.
When you press the View Report button you will see the traverse closure results.
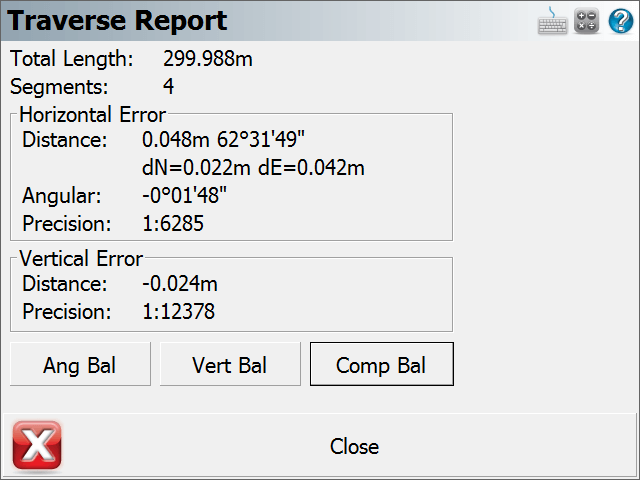
Total length
This is the total unknown legs that were measured in the field.
Segments
This is the total length traversed. Only unknown traverse legs will be added.
Horizontal Error
This is the horizontal closure and precision for your traverse. The closure direction is calculated from the known point to your measured point. If there isn't enough data to compute the angular error you will see the word "No Comparison" It also displays the delta northing and easting differences.
Vertical Error
This is the vertical error that is computed by comparing the elevations of the known point and measured closing point.
Traverse Definition (Foresight Method Bearing)
If we use CASE 3 as an example the user first setup on point 1 and backsighted point 2. He then foresighted and setup on points 3 to 6 and closed the traverse by recording one more TR record to point 7. To compute the traverse report you go to the Main Menu / Survey and choose the Traverse Report button. When selected, you will see the following screen.
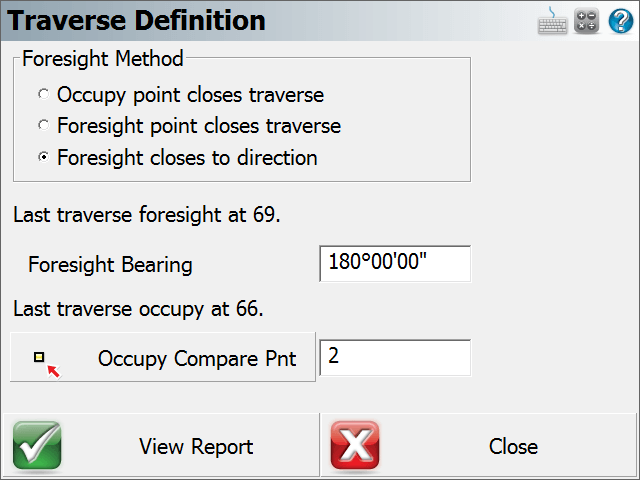
FieldGenius will automatically scan the raw file looking for the last TR foresight and the OC record that was used to measure the last foresight. It will then search for any point within a 3 meter radius and use it as the match or point that defines the original coordinates. If more than one point is found in the 3 meter radius, it will use the one that is closest. In the Foresight Bearing field, enter in a known Bearing. When you press the View Report button you will see the traverse closure results.
Raw File
Several comments will be written to the raw file with the traverse report results for both Traverse Definition types.
--Traverse Report
-- Total Length: 600.10'
-- Segments: 3
-- Foresight control point: 1
-- Occupy control point: 2
-- Horizontal Distance Error: 0.10' 286°13'38"
-- Horizontal Angular Error: 0°00'30"
-- Horizontal Precision: 1:5762
-- Vertical Distance Error: 0.00'
-- Vertical Precision: No Error
Closing the Traverse (No Backsight Prism)
For closing the traverse, sometimes you may want to measure a closing angle and compare it to your previous backsight point or to a user entered bearing. For the traverse closure we need to store a TR record in the raw file and because of this a point needs to be computed. If you can't measure a distance to a prism you can use the Manual Distance Measure Mode which will record the plate reading from your instrument and prompt you to manually enter in a distance. Type in an arbitrary distance and a closing TR record will be computed.
Traverse Rules
- All Measure Modes on the instrument toolbar, except for Sideshot (Auto Store), can be used to create TR records.
- The occupy point routine will be updated so the current setup is equal to your last TR shot, and backsight is equal to your last setup. You also need to do a setup directly after you shoot your TR record if you want to do "leap frog" traversing.
- You can have multiple traverses in the same raw file. To start a new traverse, you need to make sure the first setup point for the traverse isn't referenced in the raw file with a TR record. The most current traverse that you're working on will be used in the traverse computations.
- Only one TR record is allowed per setup.
- If you're importing your project into MicroSurvey CAD or inCAD we will automatically recognize your traverse points and create Station "traverse" setup for you in the MicroSurvey CAD or inCAD traverse file.