Backsight by 1 Point or Direction
Main Menu or Instrument Toolbar | Measure Modes | Setup & Check | Backsight by 1 Point or Direction
Use this command to specify the instrument location and orientation. You will be asked to specify the point your instrument is occupying, an instrument height and if you will be assuming a backsight direction or sighting an existing point. After you have established your setup and backsight, FieldGenius will graphically show you your setup points.
|
|
Occupied Point Location |
|
|
Backsight Point Location |
Backsight Method: Direction
With the backsight method set to Direction you will be able to specify the point you want to setup on and specify a backsight direction.
When you go to measure you have the option of recording an angle and distance to the backsight, or the option of just recording an angle. If a distance is measured to the backsight you will have the option of storing a point for the backsight after you press the measure button.

Occupy Point
Type in an existing point number, or double tap in this field to open the keypad or to select a point from the map. You will be able to create a new point, pick one from a list, or pick one from your drawing.
Instrument Height
Use this to enter your current instrument height.
Backsight Direction
Use this to specify the direction that will be used by FieldGenius. You can enter an azimuth or a quadrant bearing.
Target Height
Use this to enter your current target height.
Backsight Method: Point
Use this method to specify the points that will be used for the current instrument location and backsight.
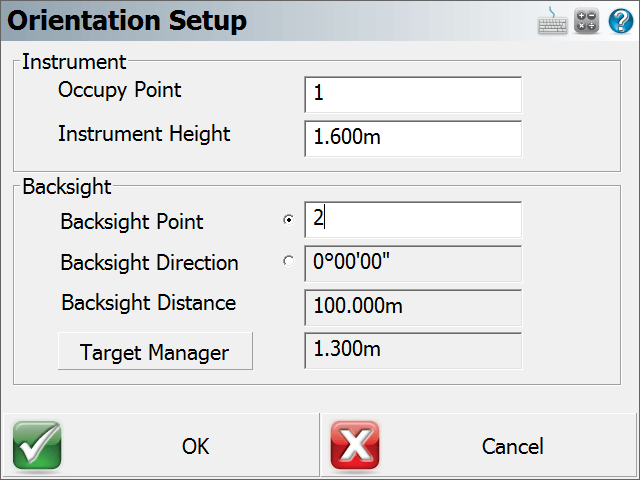
Occupy Point
Type in an existing point number, or double tap in this field to open the keypad or to select a point from the map. You will be able to create a new point, pick one from a list, or pick one from your drawing.
Instrument Height
Use this to enter your current instrument height.
Backsight Point
Type in an existing point number, or double tap in this field to open the keypad or to select a point from the map. You will be able to create a new point, pick one from a list, or pick one from your drawing.
Backsight Direction & Distance
When you enter in your points FieldGenius will display the inversed horizontal distance and direction between the points you entered.
Target Height
Use this to enter your current target height.
Measuring to the Backsight
Once you've established the backsight method, entered your points and instrument height you can move on to the next step by pressing the Observe Backsight button. You will be taken back to the map view where you will see the graphical position of your setup and backsight points. There are a few things you should take note of:
-
You can always tell what mode you're in by the "mode" text that appears near the top of your drawing. Since you're using the occupy point command you will see "Observe Backsight" near the top of the map area.
-
You have two measure modes available to you on the instrument toolbar. You can measure an angle and distance to the backsight, or measure only your current plate reading without measuring a distance. The two options are described in more detail in the Backsight Measure Mode topic.
-
You can cancel the setup by pressing the Measure Mode button and choosing "Cancel Backsight"
-
While in the backsight mode, you can use any of the controls from the information and display toolbar.
-
You can set the height of target by using the HT button on the instrument toolbar.
-
When you're ready to measure to the backsight, press the Measure button on the instrument toolbar.
Backsight Summary
After you have taken your measurement you will see a summary of your shot. From this screen you can choose to accept the shot or re-shoot it. You can also specify if you want the plate reading set to zero or a specific azimuth (if this is supported on your instrument). For more information see the Backsight Summary topic.