Staking List

Use a staking list to stake points from a predetermined list of points.

Why Use a Staking List?

The staking list is separate from the Points database. We have added intelligence to the staking list specifically for staking out. After importing points and assigning the "To Stake Out" survey role to them, you will never have a measured point appear as a point to be staked out. Moreover, the staking list will always search for and present the next nearest point (shortest path) from the current position as the next point to stake out. This functionality was added to help you stake out more points in a day.

When you start the staking list command you will see the staking list screen and it will be empty, if you haven't previously added any points to it. The image below is of a staking list that contains points.

Sort By Point ID

Use this to sort the staking list by Point ID.

Sort By Shortest Path

Select the first point you want to
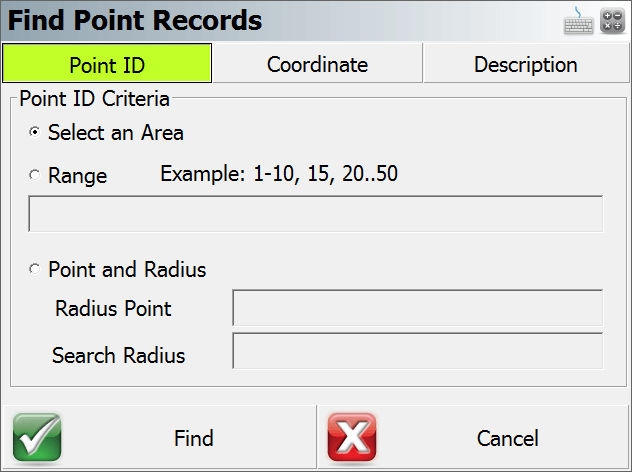
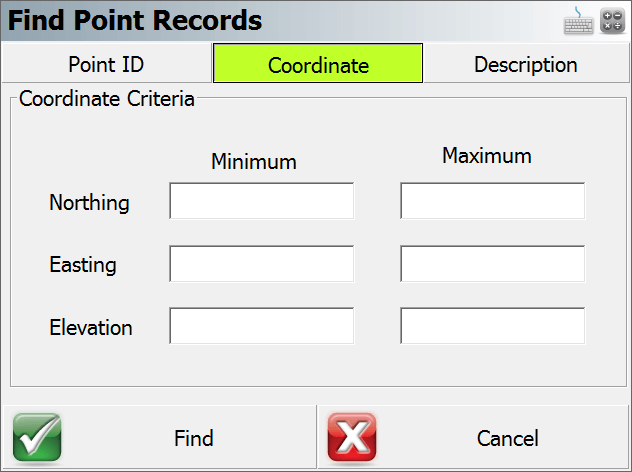
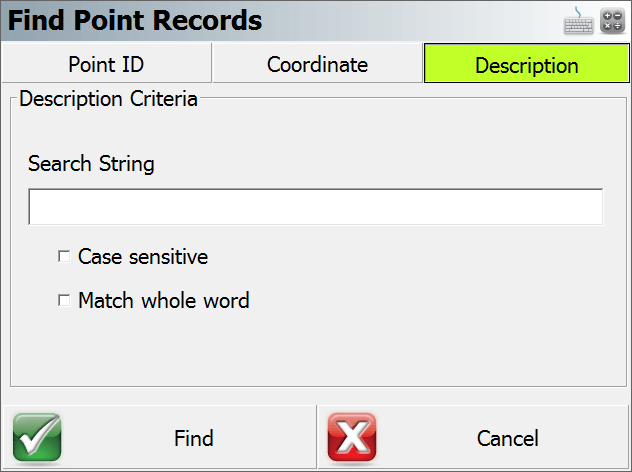
 stake, then use this to sort the staking list by shortest path distance from the selected point.

Find Points

Use this to find points that will be added to the list. You can find points based on the Point ID (which includes the ability to select points based on a window crossing in the mapview screen, by point ID range or by a single point and radius) Coordinate, or Description. The system will look in the Points database for points to add to the staking list.

Select Point

Use this to pick a point from the map. Points will be added to the list in the order they're selected.

Remove Points

Use this to delete a single row or multiple rows. This will only remove the points from the list and will not delete any points from the Points database.

Remove All Points

Use this to clear the current list. This will only remove the points from the list and will not delete any points from the Points database.

Move Up

This will move the currently highlighted point up one row.

Move Down button:

This will move the currently highlighted point down one row.

Stake Pnt

This will take you to the staking toolbar to stake out the point that is currently highlighted in the list.

Staking Status

If a point in your staking list has not been staked yet, it will have a stake icon displayed in the Staked Status column. You will see a green checkmark icon if the point has already been staked.

As you can see in the image above, point 1 has been staked, and point 2 has not.

Adding Points to the Staking List

There are two ways to add points to a staking list. You can add points that already exist in the Points database via the staking list screen by pressing the Find Points button. The alternative (and possibly the easiest) way is to assign the survey role of To Stake Out to points being imported via the ASCII Coordinate File Import button in the Import/Export Menu. When points are imported using the ASCII Coordinate File Import button and are assigned the survey role of To Stake Out, these points will automatically be added to the staking list.

Working From the List

To work from the list simply highlight the point you wish to stake and press the Stake Pnt button which will begin the process. Please see the Point Staking Toolbar topic for more information. Since you started from the staking list, it will automatically turn on the "Use Staking List" checkbox in the Stake Points screen.

When you store your stake point, the stake point command will automatically go to the next point in the list.

Survey Role Setting

The status of a point is controlled by the Survey Role type in the project database. You can view the role by using the Coordinate Database viewer. If the point is pending, it will have a survey role type of "to stake out" (point 2 in the image below). If it has been staked, it will have a survey role of staked out (point 1 in the image below).