Staking Toolbar
The
The
When you first see the
You should define a map orientation in the
Grid Staking Mode is selected by default, select the Grid button on the bottom-left corner will allows you to choose Map staking mode that relays on Observation Toolbar, or Compass staking method if you are using a GNSS receiver or robotic total station.
Note that Compass staking mode for GNSS will require movements to determine the orientation to the point you are trying to stake. Once you are close to the point, the screen will automatically switch to Grid mode for precise staking. The threshold of this switch can be found inside Staking Settings menu.
Buttons
|
Store PointWhen this is pressed the Store / Edit Points screen will appear so you can store the position of the rod. The default is to store a point in the project database as well as write raw records to the raw file. You might not want to store a point for the staked position but want to have a record of it in the raw file. This can be done by turning off "Store |
|
|
Select Viewing DirectionThis opens up Viewing Direction dialogue where you can select options depending on the current instrument Current options include: Viewing North/Instrument/Prism/User Point. |
|
|
Select Staking MethodDepending on the instrument selected, this button allows you to choose from Map, Grid, Compass staking modes. |
|
|
Staking InformationThis displays information about the point you are |
|
|
Toggle Observation ViewThis button allows you to see or hide the Observation Toolbar. |
|
|
Select Next PointThis button opens up options to select next point to |
|
|
ZoomMap View only - This will automatically zoom to the extents of your current target position and the point you're |
|
|
SettingsThis will open the |
|
|
CloseThis will close the |
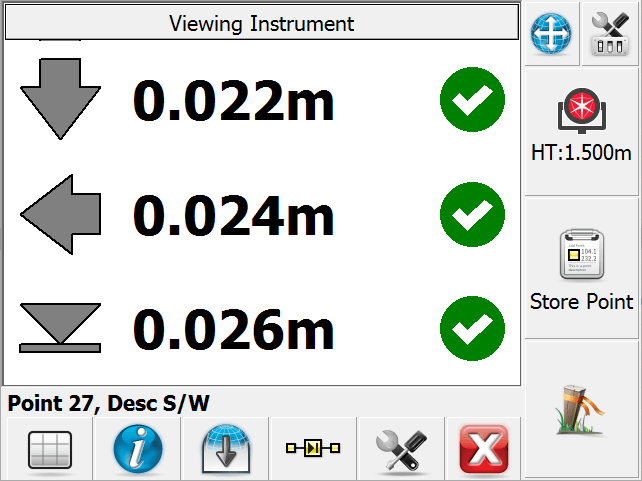
Staking Method - Map View
For each of the following methods, if you are within the Tolerance setting defined in the
Turn An Angle
This method will display both the required and measured horizontal angles in the Observation Toolbar near the top of the screen. This method is useful while staking with a conventional total station, to quickly get online with the design point.
Directional
This method will display the In/Out and Left/Right (or N/S/E/W), and Cut/Fill distances from the current rod position to the design point in the Observation Toolbar near the top of the screen. This method is useful while staking with a conventional or robotic total station, but be sure to set the "Orientation Reference" option to Prism for a conventional total station, Instrument for a robotic total station
Radial
This method will display the Direction (Bearing or Azimuth) and Distance from the current rod position to the design point in the Observation Toolbar near the top of the screen. This method is useful while staking with a robotic total station
Conventional Total Station Tips
If you're using a conventional total station you need to press the measure button on the instrument toolbar before the navigate distances are displayed.
To help with navigating, set your map orientation to Prism in the staking settings screen. This will force the map to orientate itself so the prism is at the top and the instrument is at the bottom.
You can use the Turn An Angle method to quickly get online with your point, then switch to the Directional method to navigate accurately to the point.
Robotic Total Station Tips
If you're using a robotic instrument you need to turn on the cursor tracking button on the instrument toolbar before the navigate distances are displayed. Note that with a robotic instrument, there is no need to press the measure button as the cursor tracking provides real-time positions to the Observation Toolbar.
To help with navigating, set your map orientation to Instrument in the Settings screen. This will force the map to orientate itself so the instrument is at the top and the prism is at the bottom.
You can set the EDM mode on the instrument toolbar to use a fine measurement setting that can be used to record the position of the point. When cursor tracking is on it uses a coarse mode which might not be suitable for the storing the point, but suitable enough to for navigation. For precise
- Use cursor tracking to navigate to your point.
- When you attain the position to be
- If tracking mode is precise enough for your needs you can turn off cursor tracking, then press the Lock button to stop the instrument from tracking the prism. It is useful to do this as the instrument will still be pointed at the
- If you need to take a more accurate position before marking the point or pounding in your stake: You can turn off cursor tracking, then press the measure button to help you locate the
- Mark your point or pound in your stake.
- Set the prism on the point you just marked and press the No Lock button which will initiate a search. Since you stopped the instrument from tracking in the previous step the instrument should lock onto the prism very quickly.
- Press the Measure button to record one final position for the stake point.
- Press the Store Point button on the staking toolbar to store the final location of the point you just staked.
GNSS Tips
To help with navigating, set your map orientation to North in the settings screen. This will force the map to orient itself so that North remains up on the screen.
Use cursor tracking to navigate to your point (this provides real-time positions to the Observation Toolbar) then when you attain the final position to be
Raw File
When you store your point several records are written to the raw file. Following is an example of a point that was
SP,PN1400,N 715346.319,E 2381454.812,EL1.009,--
CF,EL1.0087,GD1.0000
DE,PN342,N 715346.319,E 2381454.770,EL1.000,--
SD,ND-0.000,ED-0.042,LD-0.009
SK,OP251,FP1400,AR180.00000,ZE89.05000,SD63.0500,--Design Point: 342
The SP record is the point that was recorded when you pressed the Store Point button.
The CF record displays the measured elevation versus design.
The DE record displays the design coordinates for the point to be
The SD record displays the delta values of the
The SK record is the recorded raw observation used to compute the store point (SP) record.
Note: If you turned off "Store