Stake Surface
Main Menu | Staking | Stake Surface
The Stake Surface command allows you to take a shot anywhere on a surface and a cut or fill value will be computed. The current northing and easting position of the rod is based on the measurement, but the Z value is computed by intersecting the surface at the rod location.
You will first be prompted to select a surface to stake. If you have already imported and turned on the TIN or Contours for any surfaces, they will be displayed in the list for you to choose from. If the list is empty, you need to use the Surface Manager to import or enable one. Please refer to the Surface Manager topic for more information on how to load a surface.
When you first see the
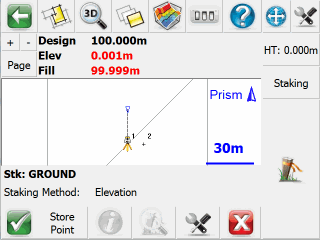
Once you take a shot you will see the following information in the Observation Toolbar near the top of the screen: the Design elevation based on the surface model's elevation at your rod's horizontal position, the actual Height or elevation of the rod, and the Cut or Fill between the two. To help you visualize where your shot is in relation to the surface you can always use our 3D view capabilities.
Staking Method
Unlike Point or Line/Arc staking, there is only one available staking method: Height.
Store Point
When this is pressed the Store / Edit Points screen will appear so you can store the position that was staked. Also a raw record will be written to the raw file.
Information
This isn't applicable when staking to a surface and will be grayed out.
Zoom
This isn't applicable when staking to a surface and will be grayed out.
Settings
This will open the Staking Settings screen which allows you to setup parameters that will be used during the staking process.
Note:
Please refer to the Point