Store / Edit Points
Main Menu | Survey Tools | Store Points
This is a multi-use function that is used by many parts of the program. Essentially any time a point needs to be stored or edited, it will done via the store point screen. Depending on what it is you're doing, certain parts of the dialog will be disabled or not editable. Following is an explanation of what you should expect.
Measured or Calculated Points
Points that were measured or computed via any of our commands will automatically have their Survey Role set to measured. When these types of points are edited, only the description can be changed; the point id and coordinate values will be non-editable. The reason we do this is so the coordinates don't accidentally get altered. You can check a point's survey role by pressing the Advanced button. You can override this by changing the survey role type to "null".
Certain commands in FieldGenius are allowed to ignore the measured survey role, such as the Rotate/Translate/Scale command or the overwrite option that is triggered when you try to store a point using a point id that already exists in the Project.
Manually Entered or Imported Points
Point that have been manually entered or imported from an ASCII file for example, will have their Survey Role set to null. Points that have a Survey Role set to null can be edited except for the point id.
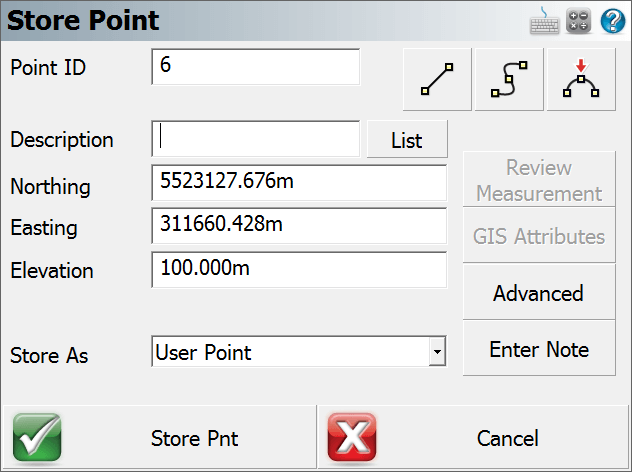
Point ID
Enter in the point number you would like to assign to the point. Note that by default it will display the next available point number. If you're editing an existing point, this field will not be editable.
Line/Spline/Arc Buttons
|
|
This is used to toggle on and off the draw lines function. When turned on as you shoot your points in the drawing they will be connected with a line. This button can only be used if you're storing a point after a measurement. |
|
|
This is used to toggle on and off the draw curvy lines button. This function will draw a best-fit curve through your points as you shoot them. This button can only be used if you're storing a point after a measurement. |
|
|
3-Point arcs can be started using the same method as for a Line or Curvy Line. This button can only be used if you're storing a point after a measurement. |
Description
This is where you can enter a description for your point.
List Button
Press this to open the AutoMap Library screen. You will be able to choose the description that will be assigned to the point.
Northing, Easting, Elevation
Input your coordinate values in these fields when manually creating a new point using the add point function. If measuring a point, you cannot manually enter or edit coordinates.
Note Button
Press this to enter a note or record an audio note for the point. See the Notes topic for more information.
Prism Hgt (Height) / GNSS Hgt (Height)
When storing a point measured by a total station, you can set the Prism Height.
Review Measurement Button
This button is available when you have taken a measurement, and can be used to review the distance and angles measured.
GIS Attributes Button
If you loaded a feature list, then this button will be enabled. It allows you to access your feature list so you can edit feature attributes.
Store Pnt (point) Button
Press this to store the measured point.
Store SS (side shot) Button
Press this to store the point as a side shot. You would typically use this when not measuring traverse points. You will not see this button when measuring with GNSS.
Store TR (traverse) Button
Press this to store the point as a traverse point. You would typically use this when the measured point belongs to a traverse. You will not see this button when measuring with GNSS.
Cancel Button
Press this to cancel the measurement.
Advanced Button
Use this button to add or edit advanced tags to your point. You will mainly use this to help you distinguish points that are exported when you use the XML export.
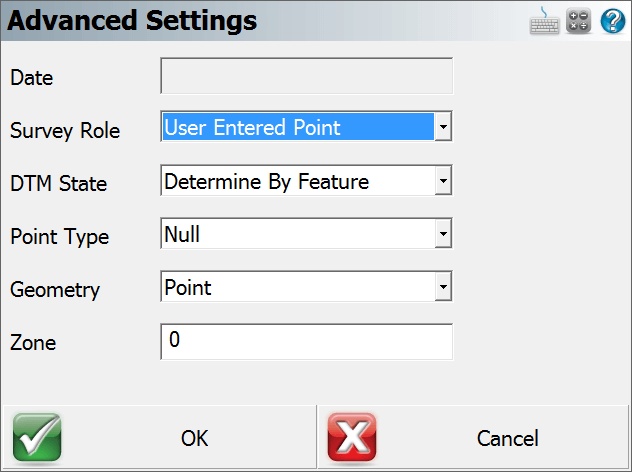
Survey Role: Use this to edit the survey role for the point. By default points that are measured will have a role of Measured. Points with a Measured role type are read only when they're viewed with the store and edit screen. If you export an XML file, this information will be exported.
DTM State: Use this to choose the DTM attribute that will be written to the database file. Determine By Feature is the default value, if you don't want the point used in FieldGenius's modeling commands, you can set the DTM value to Do not Include. If you export an XML file, this information will be exported.
Point Type: Use this to enter a point type that will be written to the database file. If you export an XML file, this information will be exported.
Geometry: Use this to enter a geometry type that will be written to the database file. If you export an XML file, this information will be exported.
Zone: Use this to enter a zone number that will be written to the database file. If you export an XML file, this information will be exported.