GNSS Reference
Create/Edit GNSS Profile
Select GNSS Profile
Main Menu | Connect
This is where you can create a new profile for each rover/base receiver you will be using.
There are two ways to get to this screen.
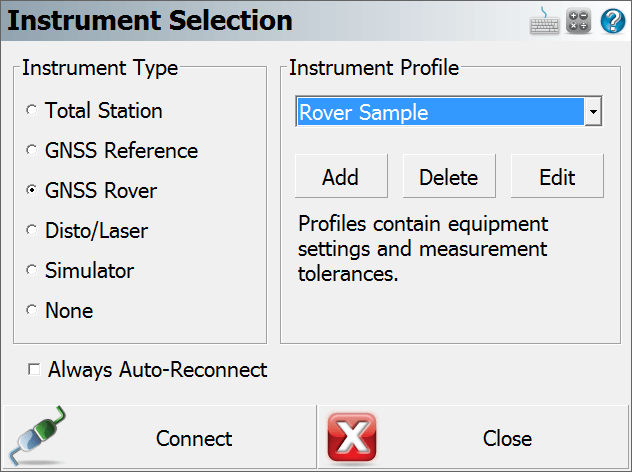
- You can open the profile screen for your rover or base by going to Main Menu | Settings | Instrument Selection. This will display the Instrument Selection screen which contains the GNSS Rover and GNSS Reference profiles.
- If you already have your instrument type set to GNSS and you're currently in the map view, you can press the Settings button on the GNSS toolbar. This will display the Instrument Selection screen which contains the GNSS Rover and GNSS Reference profiles.
Editing Profiles
On the Add Profile screen you can enter any name you wish for the profile. Profiles can be copied from one data collector to another, so you can have a "Master" profile file that is sent to all crews so they can quickly set up systems.
When you're ready to edit the settings for the profile you have selected, press the Edit button. This will display the GNSS configuration screen for the selected rover or reference profile.
Refer to the GNSS Configuration (Reference) or GNSS Configuration (Rover) topics for more information on the settings available for your profiles.
Your profiles are stored in the Settings.xml file within the ...\MicroSurvey\FieldGenius\FG Projects\ (Windows CE/Mobile) or ...\Documents\MicroSurvey\FieldGenius\FG Projects\ (Windows Tablet/PC) directory so once you have configured one data collector, you can copy this file onto other data collectors to make the profiles available on them. This file should also be backed up for easy recovery.
Using Profiles for Connection
Once you've created your profiles, you can use them to connect to your receiver. Simply select the correct GNSS Mode, either GNSS Rover or GNSS Reference, then select the profile you want to use in the profile list.
When you've physically connected the data collector to your receiver, press the Connect button to start the connection process.
If it isn't successful you will see the following message "Could not detect GNSS receiver! Please check configuration, cable and power." You can then press the Auto Detect Baud Rate button to force FieldGenius to automatically try different baud rate settings. If this doesn't work you should review your profile settings and ensure that you have the correct COM port selected and that you have your data collector connected to the correct port on the GNSS receiver.