Topo Toolbar
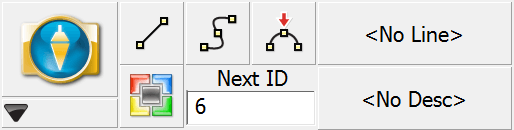
The Topo Toolbar is used to help automate linework as well as show you the description and next point number for your shot. Just like previous versions of FieldGenius you can control your linework by tuning on and off the line, arc and curvy toggles. There is also a user-programmable button that can be customized to start any command.
|
|
Main Menu ButtonThis button takes you into the Main Menu. |
|
|
Mini Toolbar ButtonThis button opens the Mini Toolbar. |
|
|
Draw Lines ButtonThis is used to toggle on and off the draw lines function. When turned on points will be connected with a line as you measure them. |
|
|
Draw Curvy Lines ButtonThis is used to toggle on and off the draw curvy lines button. This function will draw a best-fit curve through your points as you shoot them. |
|
|
Draw 3-Point Arc Button3-Point arcs can be started using the same method as for a Line or Curvy Line. However, to switch to 3-Point arc within an ongoing Line, select the Draw 3-Point Arc button before shooting the second of the three points that will define the arc (POC: Point on Curve). (Note that this is not the radius point). After measuring to the 2nd point, a dashed line will appear to illustrate that a 3-Point arc is in progress. Shoot the 3rd point and the arc will appear. The current draw option will change from Draw 3-Pt Arc to Draw Line after the third shot and the arc is complete. Compound 3-point arcs are supported. Simply re-select the 3-Point Arc button before measuring the next POC. |
|
|
User Defined ButtonThis button can be customized to start any command. By default it opens the Coordinate Database, but this can be changed in the Keyboard Shortcuts settings. |
|
|
Next ID FieldThis field displays the point number that will be assigned to your next shot. You can change it at any time prior to recording your shot. In a new Project this field will always start at 1. If you open an existing Project, then we scan the raw file for the last sideshot or store point and if we find one, we'll set the point number accordingly. For example, if the last sideshot in the raw file was to point 58, then the next time the Project is setup we will set the next id to 59. |
|
|
Active Line List ButtonMuch like the first line in the Project, just select the desired description from the list and select the desired draw option before shooting the first point for the new line. When you press the button a screen will appear listing all your active lines. Selecting one of them and pressing the OK button will make it the current line. The key to note is the display of -Start Line- in the Active Lines list. Once the first point for the new line has been measured, the Active Lines list will set and display the new line as current. To change the current line, simply select the desired line from the Active Lines list and continue taking shots to add to the selected line. All settings are stored for each line so there is no need to re-select the Description or draw option. |
|
|
Description Selection ButtonUse this button to set the current description that will be used when you shoot your points. When you press the description button you will see a screen listing all the descriptions read in from your AutoMap Library. Select the description you want to use and press the OK button. You can type in the letters of the description which will automatically scroll to the descriptions matching your entry. |