AutoMap Library
Main Menu | Settings | AutoMap Library
The AutoMap Library editor allows the user complete control over the visibility of points and lines based on the descriptions used to code the points. It also allows you to set attributes for the descriptions such as point and line colour.
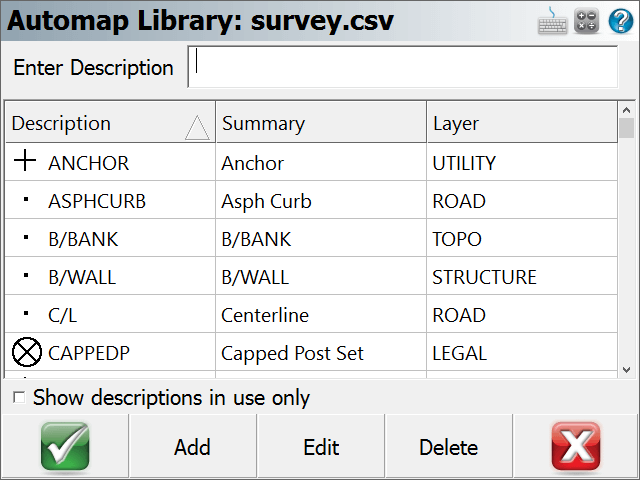
Enter Description
Use this field to auto scroll to description in your list. For example, typing the letters AS will scroll down to the ASPHCURB description. If you type a unique description and press enter, you will be prompted for whether you want to add it into the AutoMap Library or not.
Show descriptions in use only
Use this to display only the descriptions found in your AutoMap Library that are used in the current Project.
Adding Descriptions to the Library in FieldGenius
While you're working you can add descriptions to the AutoMap Library on the fly. When you enter a description that isn't in the library you will be prompted with a message asking you if you want to add it to your Project's AutoMap Library file.
Note: This prompt can be turned off so FieldGenius always uses the new descriptions without adding them into the AutoMap Library file. To do this you need to make sure you have the "Prompt New Descriptions" toggle turned off in the Options menu.
If you answer Yes, then the description will be added into the Project's AutoMap Library file (not to the AutoMap Template file).
If you answer No, then the description will be used without adding it into the AutoMap Library. If you do not add it to the AutoMap Library, then you will not be able to set options such as defining the layer and colour of points and lines with this description.
Editing Descriptions in the Library in FieldGenius
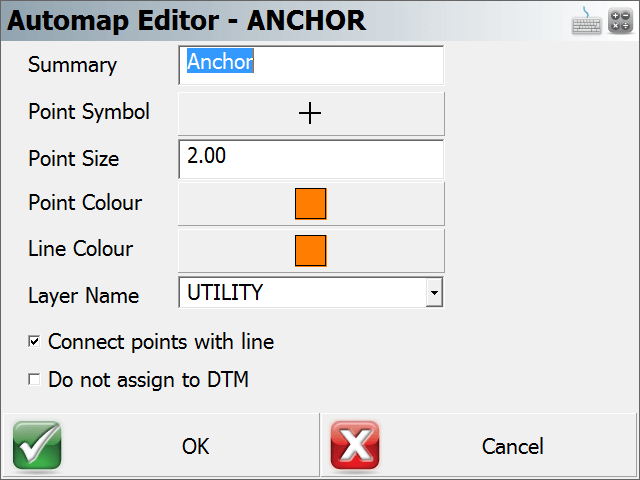
The AutoMap Library editor allows you to edit properties for each description in the library. Pressing the Edit button will bring up the menu shown below for the selected entry:
These properties are stored in the library in specific columns. Please refer to the topic below about editing the library for more information.
Summary
You can use this field to summarize your description. For example, a description IP may have a summary Iron Pin.
Point Symbol
You can define a marker for a point. These markers are not automatically transferred back to the desktop and are not similar to CAD blocks or parts. They are simply point nodes that will be displayed in the map view to help distinguish different points on the screen. There are 27 different marker types. The symbol for each description is also shown on the AutoMap Library screen.
Point Size
This allows you to change the size of the marker. You will find that using a number of 1 is a good starting point. Adjust from there as needed.
Point Colour
This allows you to set the colour of the markers. You can choose from a list of 255 colours.
Line Colour
This allows you to change the colour of lines in your drawing.
Layer Name
This specifies the layer that will be used for lines and points with this description.
Connect Points With Line
If this is checked, when you select the description from the topo toolbar on the main display, the connect lines toggle will be turned on automatically. Use this for descriptions that typically are connected by lines such as an edge of road or ditch center line.
Do not assign to DTM
This is very useful for the creation of real-time surface models. If you toggle this ON, then these points will not be included in any DTM created with FieldGenius. Use this for descriptions that are not at ground level.
Deleting Descriptions from the Library from FieldGenius
The AutoMap Editor allows you to delete descriptions from the library. Pressing the Delete button will prompt you to make sure that you want to delete the selected entry. This will delete that entry from the Project's AutoMap Library file, it does not affect the AutoMap Template file.
Editing an Existing Library outside of FieldGenius
The AutoMap Library is a very powerful feature in FieldGenius. When combined with our desktop products, your downloaded files can literally be imported, layers and symbols placed in seconds. For this topic we will concentrate on helping you work with and edit the AutoMap library using FieldGenius.
The FieldGenius AutoMap library is a comma delimited file that can be edited with MicroSurvey CAD or inCAD, with a text editor like Microsoft Notepad, or with a spreadsheet application like Microsoft Excel. Since not every FieldGenius user owns our desktop software we will discuss editing the file with Excel.
The first row in the file is reserved for the column header. Some of the columns are reserved for our desktop products, but the following columns are used in FieldGenius.
Column A = Description (String value)
Column B = Summary of Description (String value)
Column L = Connect Points with Line (1=Yes, 0=No)
Column M = Layer Name (String value)
Column O = Line Colour (Number 0-255)
Column Q = Line or Spline (0=Spline, 1=Line) *** This works in conjunction with Column L.
Column U = Marker Type (Number 0-26)
Column V = Marker Size (Number 0-10)
Column W = Marker Colour (Number 0-255)
Column X = Exclude from DTM (1=Yes/Exclude, 0=No/Include)
Column AF = Zone Number (Numeric Value)
Create New Library outside of FieldGenius
You can easily start a new library from scratch simply by creating a simple text file. In the first row add a header followed by your descriptions and summaries. You have to separate the values with a command and when you're done save the file with an extension of .CSV - an example filename might be CODES.CSV.
DESCRIPTION,SUMMARY
PIN,Iron Pin,
EC,Edge of Concrete,
EP,Edge of Pavement,
You can then copy the file to your ...\MicroSurvey\FieldGenius\FG Projects\ (Windows CE/Mobile) or ...\Documents\MicroSurvey\FieldGenius\FG Projects\ (Windows Tablet/PC) directory. When you create a new Project or open an existing one, make sure to select it as the AutoMap Template File.