Resection
Main Menu or Instrument Toolbar | Measure Modes | Setup & Check | Resection
FieldGenius has a multi-point resection routine that can be used to compute a point for a setup. It will use a least squares solution to determine the coordinates from the measurements you make to your points. The goal at the end of a resection is to compute the unknown coordinates of the instrument's current location based on measurements made to other known points in the Project.
- As a minimum you need to have two points to resect off.
- You can shoot the resection point in the direct or reverse face.
- You can take multiple shots to the same resection point.
- There is no limit to the amount of points you can resect off.
- When you store your resection point, an occupy record will be created for you automatically.
Specify the Resection Reference Points
First Shot
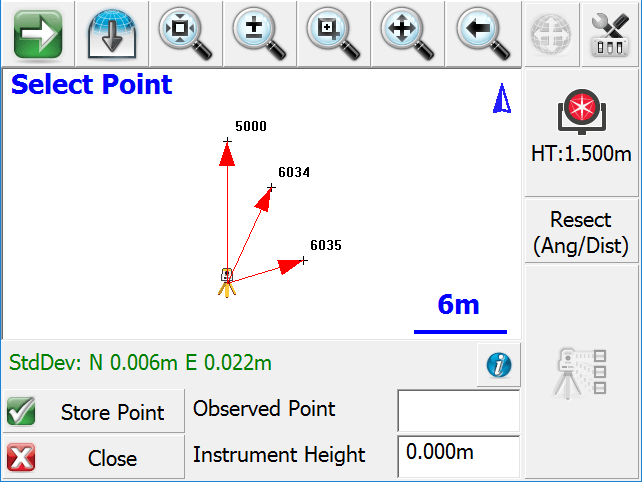
When you start the command you will see the reference point toolbar. Specify your instrument height and select a reference point to measure. After you select a point, you can press the Measure button to record a shot.

Second Shot
To record the second shot, simply select it from the map screen, then press the Measure button. A minimum of two points are needed to compute a position for the instrument, but you can shoot more points if needed to increase the accuracy of the instrument position. The estimated accuracy of the instrument location will be displayed for you on the toolbar. If the estimated error is within your own tolerances, then you can go ahead and store the point by pressing the Store Point button. All successful solutions will be displayed with green text starting with the characters StdDev:.
Press the Close button to cancel out of the routine. You may need to do this if the solution does not converge, and you need to restart the routine.
Three or More Shots
If you have more points to reference to you can continue measuring them using the same process as you did when you shot the second point. As you record more points you should notice that the standard deviations for the northing and easting will begin to get smaller.
Standard Deviation
This is the computed precision for the overall geometry of the resection. Small errors indicate that the measured data "fits" very well with the geometry defined by the known points.
Large errors can indicate that bad measurements were recorded, either due to careless measurement practices such as not holding the prism pole straight or not carefully sighting the prism. Large errors can also happen if the geometry defined by the known points, is not "in the same place" as it was when the points were previously measured.
Please note that while the Standard Deviation relates to the quality of your resection, it is possible to have a low StdDev yet still have a high positional error. As such, it is important that you also look at the angle and distance errors shown in the Information screen when considering the overall accuracy of your resection.
Information (Horizontal and Vertical Filters)
|
|
You can enter this screen by pressing the Information button on the top right corner of the reference point toolbar. When you do, you will see a detailed summary of the measurements. |
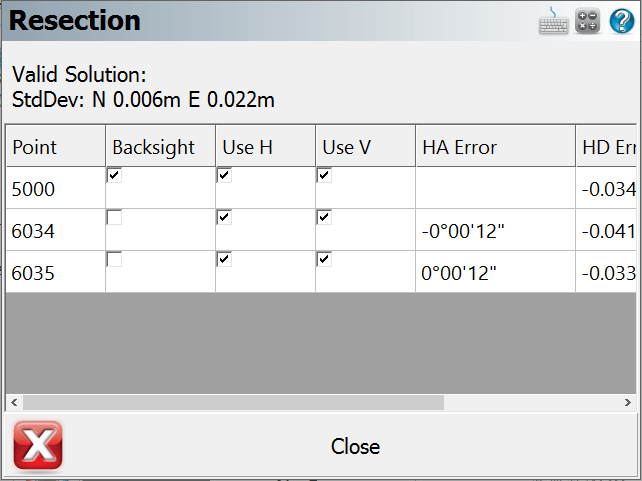
You can determine how each shot to the reference points should be used to compute the resection point. By default each observation you make will be used to compute both the horizontal and vertical position of the resection solution, but you can override this by setting the Use H and Use V options for each measurement.
|
Use H |
Use V |
Result |
|
a |
a |
This shot will be used to compute both the horizontal and vertical position. |
|
a |
r |
This shot will be used to compute only the horizontal position. |
|
r |
a |
This shot will be used to compute only the vertical position. |
|
r |
r |
The shot will be ignored in the computation. |
You can also select which observation is to be your backsight point.
HA Error
The horizontal angle error is computed as follows. Using the computed resection point and the measured horizontal angle, a theoretical direction is computed to the reference point. This direction is then compared to the direction measured (plate reading) and the difference is noted in the HA Err column.
HD Error
The horizontal distance error is computed as follows. An inverse is made between the resection point and the reference point. This inversed distance is then compared to the measured distance and the difference is noted in the HD Err column.
VD Error
The vertical distance error is computed as follows. Using the resection elevation, and the observation to the reference point, a new elevation is computed for the reference point. This computed elevation is then compared to the reference point's original elevation and the difference is noted in the VD column.
Resection Modes
At any time during the collection of your observations you can choose to shoot an Angle & Distance or Angles Only measurement. You can control this by pressing the Measure Modes button on the instrument toolbar after you have started your resection.
Store the Resection Point
When you're satisfied with the resection point you can store its new position by pressing the Store Pnt button. This will then display the store / edit screen.
Finally you will see the backsight results screen.
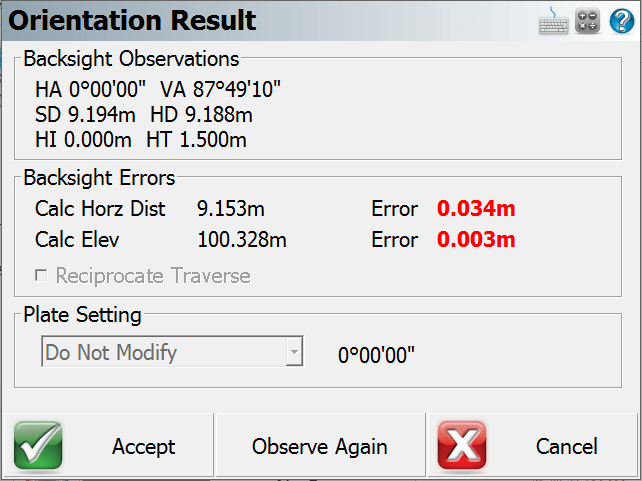
The backsight point that will be stored will be based on which point you selected in the Information screen shown above, which by default is the first reference point you observed. You do not need to take another measurement to the backsight as it has the original measurement you made. At this point you can do the following:
- Confirm the instrument and target heights.
- Decide if you want to set the plate reading on the instrument to zero or an azimuth.
- Decide if you would like to sight it again and take another measurement.
If you're satisfied with the backsight, you can store it by pressing the Accept button. If you're setting a plate reading on the instrument, you need to make sure it is pointing at the backsight point prior to pressing the Accept button. For example, if you want to set zero on the backsight point, you need to make sure that the instrument is pointing at the backsight point.
Raw File Record
After you store the point, several records will be written to the raw file.
--Resection
SP,PN5000,N 1009.1534,E 1000.0000,EL100.3244,--
SP,PN6034,N 1006.1995,E 1002.8319,EL99.7321,--FS
SP,PN6035,N 1001.4706,E 1004.8775,EL99.7361,--FS
RS,PN5000,CR359.59590,ZE87.49010,SD9.1600
RS,PN6034,CR24.33000,ZE92.03450,SD6.8280
RS,PN6035,CR73.13080,ZE92.43050,SD5.1010
SP,PN6036,N 999.9998,E 999.9998,EL100.0011,--
OC,OP6036,N 999.9998,E 999.9998,EL100.0011,--
SP,PN5000,N 1009.1534,E 1000.0000,EL100.3244,--
BK,OP6036,BP5000,BS0.00039,BC0.00000
--Occupy Check
-- Observed Values: HA 0°00'00.0" VA 87°49'22.0" SD 9.160m HD 9.153m
-- Distance Calculated: 9.154m
-- Distance Error: -0.000m
-- BS Elevation: 100.324m
-- BS Elevation Error: 0.001m