Default Settings
Total Station Toolbar | Target Manager | Default Settings
The Default Settings screen is where you can define the default target heights for prism targets, RL (reflectorless) targets, and a temporary height. The temporary height value is used for taking a one-time measurement using the height value entered in this field. After the measurement is completed, the system will revert back to using the current target height.
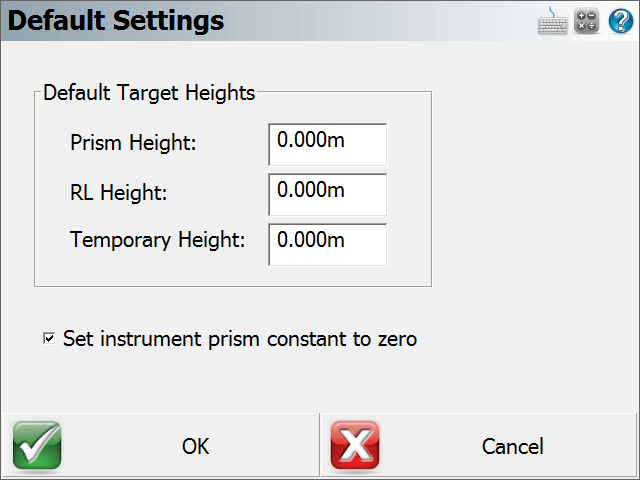
Prism Height
Enter your most common prism height into this field. When you press the Use Default Height button in the Target Manager screen, this value will populate the Target Height field. This is convenient when you have a standard prism height and want to assign it quickly.
Important Note: You must be in a prism measure mode to be able to use the Default Height button in the Target Manager screen and have it use a default prism height.
RL Height
Enter your most common ReflectorLess (RL) height into this field. When you press the Use Default Height button in the Target Manager screen, this value will populate the Target Height field with this default height.
Important Note: You must be using a reflectorless measure mode to populate this field using the Default Height button in the Target Manager screen, and have it use the default reflectorless height.
Temporary Height
The temporary height function works as a one-time measurement using the height entered into this field. After the measurement has completed, the target height will revert back to the height that had been defined in the Target Height field. This is very handy when you want to take a quick one-time measurement such as for when measuring an invert.
Set instrument prism constant to zero
If this has a check mark in the box, a prism constant of zero will be uploaded to your instrument. The offsets specified in the foresight and backsight targets will be applied to the measurements when received by FieldGenius. Remove the check mark if you don't want FieldGenius to modify your instrument's prism offset. Not all instruments support this feature.
When you connect your instrument to FieldGenius, special notes are recorded in the raw file regarding prism offsets.
If you have the ”Set Instrument” toggle turned on and your instrument supports this feature, FieldGenius will set your instrument's prism offset to zero so no correction will be applied to the measurement. Then once FieldGenius receives this uncorrected measurement, it will use the values you specified in the prism offset fields and adjust the distance accordingly. For example, if you specified an offset of 30mm, FieldGenius will upload an offset of zero to your instrument and apply the 30 mm offset to the measurement after it is received. In your raw file you will see the following note:
--FieldGenius Prism: 30mm Instrument Prism: 0mm
Most prism offset are specified in millimeters. FieldGenius will make the necessary conversions so the proper adjustment is applied.
If FieldGenius can't set the prism offset on your instrument, it usually can't read it either. Since a prism offset wasn't uploaded, we don't know what prism offset is set on the instrument. So we indicate this by writing to the raw file that the instrument prism offset is "unknown".
--FieldGenius Prism: 30mm Instrument Prism: Unknown
When this happens you will usually want to confirm what offset are currently configured on your instrument in regards to prism offsets.
Special Notes:
- When using instruments that don't support uploading of prism constants, be sure not to double up your prism offsets by applying it in the instrument and FieldGenius at the same time.
- Since prism offsets are so important, on the measurement progress meter you will see what offset is being applied to your measurement.
OK
Pressing this button will save your changes in this dialog, and return you to the Target Manager.
Cancel
Pressing this button will ignore your changes in this dialog and return you to the Target Manager.