Overview
There are three different modes available for programming a position into your reference receiver.
When you're ready to program your base receiver with a position you need to select the reference position mode then to start the process press the Measure button on the GNSS toolbar. Please review the following sections for a detailed explanation of how each mode is used.
Known Geodetic Position
Main Menu or GNSS Toolbar | Measure Modes | Known Geodetic Position
Use this when you know the geodetic position of the point the base is setup on. You have two options, you can program it with a known Geodetic or known Cartesian Coordinate.
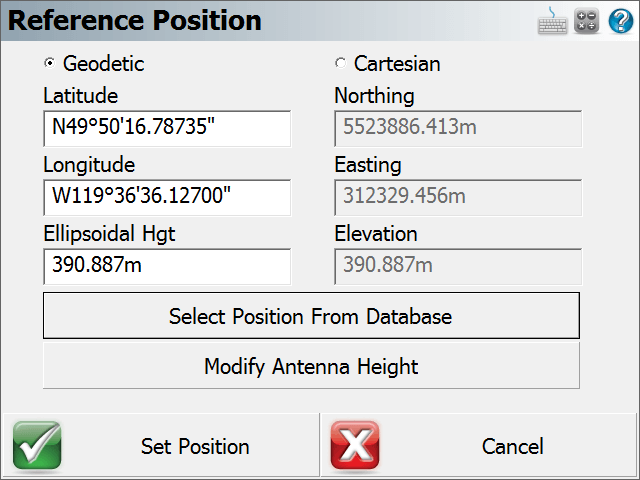
Geodetic Coordinates
Enter the know Latitude, Longitude and Ellipsoidal Height for your base setup. The coordinates you enter here will be programmed into the receiver.
Cartesian Coordinates
Cartesian coordinates can be SPCS, UTM coordinates or any other grid system as long as it matches the horizontal and vertical system you've defined in your GNSS profile. You cannot enter local coordinates as Cartesian coordinates! Doing so will cause a warning message to be displayed indicating that the coordinates you entered do not fall inside the GNSS grid files you have loaded on your data collector.
Select Position from Database
This allows you to choose a point a number of different ways. The point you select must be a grid coordinate such as a SPCS or UTM coordinate.
Averaged Geodetic Position
Main Menu or GNSS Toolbar | Measure Modes | Averaged Geodetic Position
Use this to measure and average an Autonomous Geodetic position.
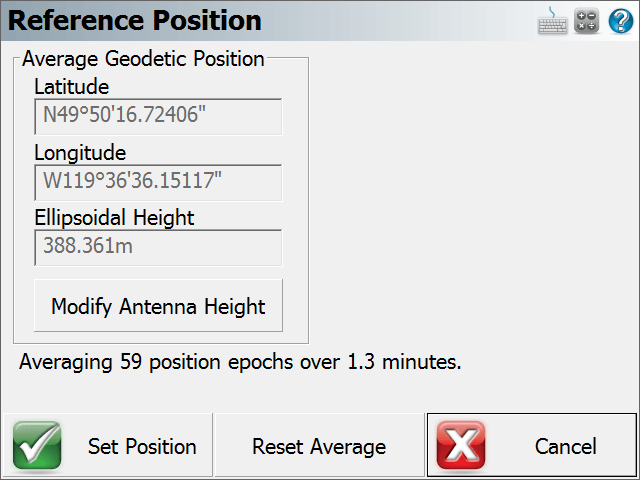
It is up to you to determine how many observations or the duration of time you want to wait before accepting the averaged position. At any time you can restart the process by pressing the Reset Average button.
If you press Set Position, your receiver will be programmed with the new position and you will have the option of storing a point's position in the database.
Local Transformation to Point
Main Menu or GNSS Toolbar | Measure Modes | Local Transformation to Point
Use this to compute a one point transformation so your GNSS derived measurements can be referenced into a local system.
When this option is used, FieldGenius starts receiving data and computes an averaged Autonomous position for the base receiver. The current position, how many epochs it has received and the total elapsed time is displayed on the screen.
It is up to you to determine how many observations or the duration of time you want to wait before accepting the averaged position. At any time you can restart the process by pressing the Reset Average button.
You then have to define a local coordinate that you want to localize to. It is assumed that the point exists in your Project. If it doesn't, simply double tap the Point ID field which will open the point toolbar. You can use the new option to create a point or if it exists select it from the map or from the list.
When you press Set Position, FieldGenius will save the averaged location into the point database. It will then compute a one point transformation which is simply a horizontal and vertical shift from the grid coordinate system into your local system, as well as a combined scale factor. You will be presented with the option to apply the combined scale factor at the point
Pick Yes if:
- You are calculating a one point transformation and your Project coordinates are ground-level coordinates. Please Note: No rotation will be applied and the Project North direction will be Grid North as per your Project Coordinate System Settings.
Pick No if:
- You are calculating a transformation from multiple points and will be adding more points to the calculation. In this case the scale parameters will be determined from the best fit to all the points used for the transformation.
- You are calculating a one point tranformation and your Project coordinates are grid coordinates as per your Project Coordinate System Settings.
All future GNSS measurements in the current Project will have your new transformation parameters applied automatically.