Line - Distance Offset
Main Menu or Instrument Toolbar | Measure Modes | Offsets | Line - Distance Offset
The line distance offset command is used to define two points that will be used to establish a reference line. Once the reference line is established you can then specify offsets along the reference line to the new point.
This is a very powerful offsetting tool that can be used in a lot of different situations.

When you define your reference line, there are three types of offset that can be applied.
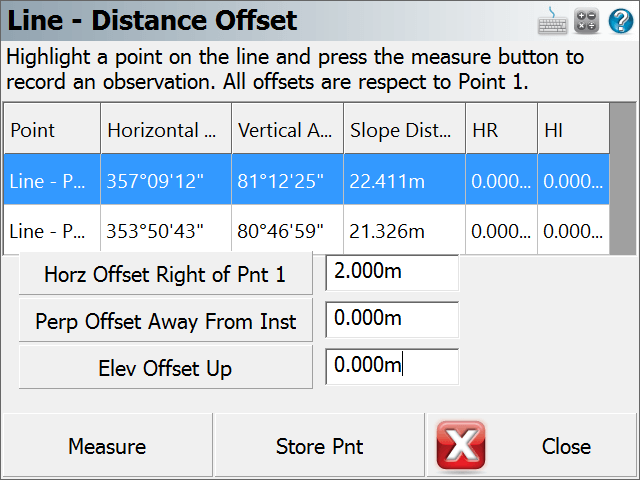
You can define a horizontal offset, a perpendicular offset and a vertical (elevation) offset. Each offset button is a toggle that allows you to toggle how the offset is to be applied in relation to the reference line.
When you define the offset direction, you can then enter in the value that you want to offset by.
If the horizontal offset remains set to zero, perpendicular or elevation offset will be applied in relation to point one on the reference line.
Offsets
Horizontal Offset
The horizontal offset can either be left or right of the first point on the reference line. From the total station's perspective, if the new point is to the right of point 1, then you would use the Horz Offset Right of Pnt 1. If it is to the left, then logically, it would be a left offset so you would use the Horz Offset Left of Pnt 1 setting.
Perpendicular Offset
The perpendicular offset is a horizontal distance applied perpendicular to the reference line. From the total station's perspective, when moving perpendicular from the reference line, if the new point ends up being closer to the total station, then you would set the perpendicular offset to Perp Offset Towards Inst. Alternatively, if the new point ends up being farther from the total station, then you would use the Perp Offset Away From Inst.
Elevation Offset
This is the vertical offset from the reference line to the new point. If the new point is above the reference line, then you would set this to Elev Offset Up. If the new point is below the reference line you would set it to Elev Offset Down.
Measure Points
When you start line angle offset command, you will see an empty list.
Highlight the row that you would like to make a measurement for and simply press the Measure button to begin the measuring process.
If you need to redo a measurement, simply highlight it in the list and press the measure button.
Notes:
1. The northing and easting values for the new point will be computed using the horizontal and perpendicular offsets defined by the user. These horizontal offset is referenced to point 1 on the reference line. The perpendicular offset is a perpendicular offset from the reference line.
2. The z value for the new point will be computed using the projected elevation along the reference line, plus or minus any elevation offsets defined by the user.
Note: You can increase the size of the text shown in the grid by setting the Text Size option in the Options screen.
Store the Point
Once you've made your measurements that will be used to compute the intersection, you can press the Store Point button. This will store a point in the map screen, store a point in the database as well as record information to the raw file.
Raw File
Everything about the intersection is stored in the raw file.
--Line - Distance Offset
--HI0.000,HR0.000,AR357.09120,ZE81.12250,SD22.4114,--Pnt 1 of Line
--HI0.000,HR0.000,AR353.50430,ZE80.46590,SD21.3255,--Pnt 2 of Line
--Horizontal Offset: 2.000
--Perpendicular Offset: 0.000
--Elevation Offset: 0.000
SP,PN1018,N 123.5558,E 100.2931,EL103.4035,--EV2
Example
The top corner in a closet needs to be located, but it isn't visible from the total station.
So the user lays a hand tape on the floor, with the start of the tape located at the bottom corner of the closet, directly below the point that needs to be recorded. The direction of the tape is then laid out such that two measurements can be made on the tape.
Essentially, the tape now becomes the reference line. Two shots are taken, one at the 2 foot mark, and the other at the 5 foot mark.

After you take your two measurements, all you need to define is the offset distances. In this example, the corner is two feet to the right of the first measurement (point 1), and 8' up from the floor. After you define the offset directions and offset amounts, you can press the Store Pnt button to store the new point.
