Drawing Tool
Main Menu | Survey Tools | Drawing Tool
Line Toolbar | Pencil button
Point Toolbar | Pencil button
This tool allows you to quickly draw a plan such as a pad or a building footprint into your Project, and is typically used to recreate plans from a paper hard-copy. You can use this to either calculate new points, or to connect existing points that are already in your Project.
You must have at least one point in your Project before you can start, to define the starting position for your plan. If a point does not yet exist (for example if this is the first command you run in a new Project), you will be prompted to store a new point before you can proceed.
Line Mode
Use the Line draw mode to add straight line segments to your figure.

Start Point
Specify the start point for the new segment.
For starting a new plan, this should be set to an existing point in your Project, typically a corner that you will begin drawing the plan from.
As you continue adding subsequent points/segments to your plan, you will see the Start Point field automatically advance for you.
Distance
Specify the length of the line segment you wish to draw.
Direction
Specify the direction (Azimuth or Bearing) of the line segment you wish to draw. The easiest way to do this is to use the right/left arrow buttons, which will increment/decrement the direction value by the amount shown in the pulldown list below the arrows. You can select a common angle from the choices in the list (90, 45, or 30 degrees), or you can type any value if you need to increment it by some other amount.
Store
After you have defined the segment to add, press this to store the new point and line segment into your Project.
Store+
This does the same as the Store button, but you will see the Store/Edit Point screen. Use this to confirm or view the coordinates, or to specify a description.
Point by Line Mode
This is the same as the Line mode, except that when you press Store or Store+ it will only store the point, without drawing the line segment.
Arc Mode
Use the Arc draw mode to add arc segments to your figure.
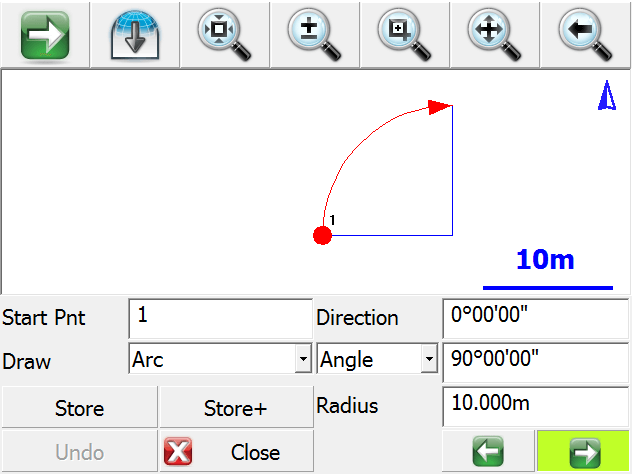
Start Point
Specify the start point for the new segment.
For starting a new plan, this should be set to an existing point in your Project, typically a corner that you will begin drawing the plan from.
As you continue adding subsequent points/segments to your plan, you will see the Start Point field automatically advance for you.
Direction
Specify the direction (Azimuth or Bearing) of the tangent in to the arc segment you wish to draw. This will default to either the direction of the previous line segment or the tangent out of the previous arc segment, so as long as your arc is tangential to the previous segment you will not need to change this value.
Angle / Chord Length / Arc Length
Specify one of the three available methods to define your arc:
-
Angle: Enter the interior delta angle of the arc.
-
Chord: Enter the chord length of the arc.
-
Arc: Enter the arc length of the arc.
Radius
Specify the radius to define your arc.
Clockwise / Counter-Clockwise Arrows
Use the Right/Left arrow buttons to define whether the arc rotates clockwise or counter-clockwise.
Store
After you have defined the segment to add, press this to store the new end and radial points, and draw the arc segment into your Project.
Store+
This does the same as the Store button, but you will see the Store/Edit Point screen. Use this to confirm or view the coordinates, or to specify a description.
Point by Arc Mode
This is the same as the Arc mode, except that when you press Store or Store+ it will only store the points, without drawing the arc segment.
Connect Points Mode
This mode lets you draw lines/arcs by connecting points that already exist in your Project.
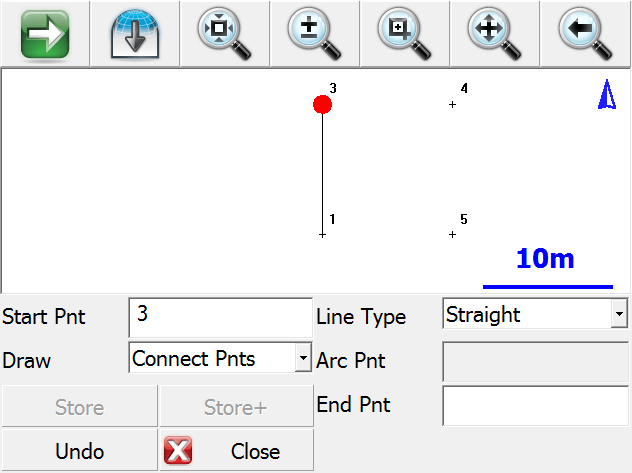
Start Point
Specify the start point for the new segment.
For starting a new plan, this should be set to an existing point in your Project, typically a corner that you will begin drawing the plan from.
As you continue connecting subsequent points to your plan, you will see the Start Point field automatically advance for you.
Line Type
Specify one of the five available methods to define your next figure segment:
-
Straight: this will draw a straight line between the specified Start Point and End Point.
-
Arc (CW): this will draw a clockwise arc between the specified Start Point and End Point, with the specified Radial Point.
-
Arc (CCW): this will draw a counter-clockwise arc between the specified Start Point and End Point, with the specified Radial Point.
-
Arc (3Pnt): this will draw an arc (clockwise or counter-clockwise) between the specified Start Point and End Point, going through the specified intermediate Arc Point (any point directly on the arc, does not need to be the midpoint).
-
Spline: this will draw a curvy line between the specified Start Point and End Point.
Store / Store+
The Store and Store+ buttons are disabled for this mode, because new points are not being calculated for your Project. The line or arc segment will be automatically drawn into your Project after you specify its parameters.
Undo
Press the Undo button to undo the last segment you computed, removing both the point and/or the line segment (as appropriate) from your Project. You can undo multiple steps.
Note, there is no Redo function.
Close
Press the Close button to exit from the Draw Plan command, and you will be returned to the map screen.