Backsight Baseline
Main Menu or Instrument Toolbar | Measure Modes | Setup & Check | Backsight Baseline
When setting up a total station or Disto in a room or outside at a Scene, in certain circumstances it is advantageous to define one of the room's walls as a baseline for the scene. Or outside to select a linear feature like a Sidewalk or curb.
Using this method ensures that your room or outside Scene coordinate system is oriented to a baseline plane you are defining for the site. This makes the Scene easier to work in FieldGenius and when imported into your desktop drawing program.
Another benefit to using this feature is that all points mapped with the total station will be referenced to the origin and baseline.
Function
Usually this feature will be used in a new Project, but it could be used in an existing scene if needed. In this example we will begin by creating a new scene.
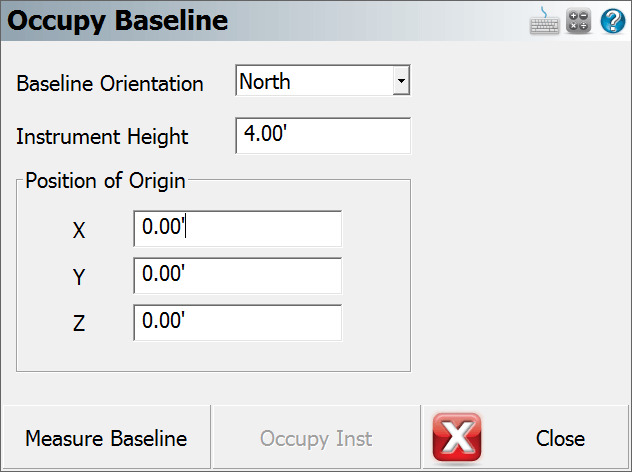
In the Occupy Baseline screen you need to specify the orientation of the baseline, your instrument height and the position that you want to use for the origin point.
Baseline Direction
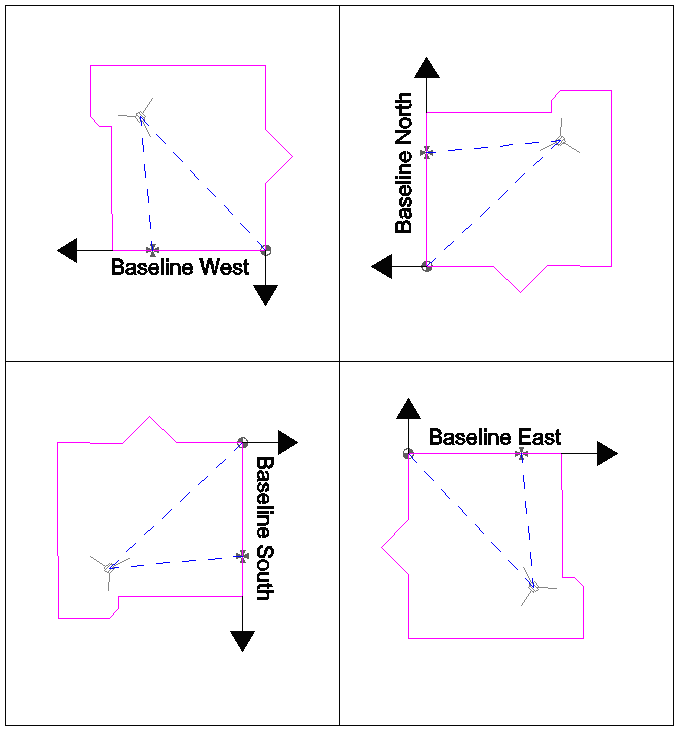
This is the direction that you want the wall ”baseline” to face in your Project. The direction that you use is totally up to you. You should pick a direction that will help you visually confirm that the points you're mapping are correct. If you refer to the image at the beginning of this document, the instrument was setup in the lower right corner of the room. From the instrument operator's perspective, it made sense to use a baseline set to East so the far wall would be horizontal along the X axis in the Project. If you look at the image of the Tracker at the beginning of this topic, you will see that using this feature makes the room align with your scene's coordinate system.
In the examples below, the same origin coordinates and total station measurement were used. The only thing that was different, was the direction specified for the baseline.
Position of Origin
The default coordinates are 0, but any value could be used. The origin will be located and defined by your first measurement.
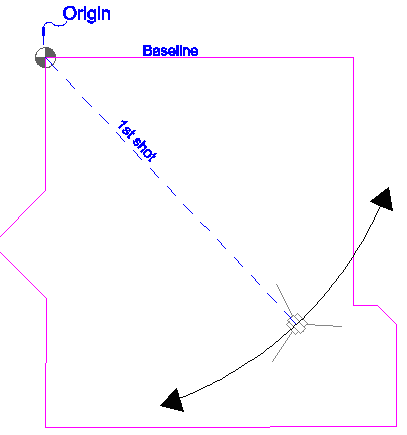
Usually you will want the bottom corner of the wall to be equal to the z value you define. Assuming you're using a reflectorless instrument, if you can't see the bottom corner directly with the instrument, you can measure up the wall and mark a point a known distance from the floor. Then sight this point with you instrument, but make sure you define the distance you measured as your new target height.
Otherwise, if no target height is specified, the location you measure at the corner will be the origin.
Measure Baseline
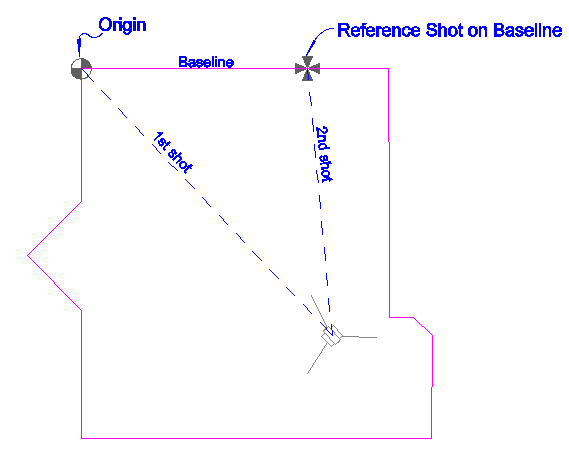
When you press this you will be required to measure two shots; one to define the origin and the other to define the location of the instrument in reference to the baseline.
How it Works
Using the origin, and the baseline direction you specified, a ”baseline” is created.
Using the first shot, the instrument position cannot be accurate calculated yet. The instrument isn't referenced to the baseline yet, and hinges around the origin point.
Then using the second shot, the total station location in the room can be accurately computed.

Store Reference (Occupy) Position
After you finish measuring the necessary measurement, you will be taken back to the Occupy Baseline screen.
You will now see that the Occupy Inst screen is enabled. Press this to accept your measurements and FieldGenius will store a new point for the reference point. Also, in the raw file Occupy point records will be recorded along with the measurements made on the wall.
--Occupy Room
--Baseline Direction: East
--N 0.0000,E 0.0000,EL0.0000,--Origin Pnt
--HI1.310,HR1.514,AR25.16100,ZE88.26290,SD7.0790,--Pnt for Origin
--HI1.310,HR1.514,AR63.18170,ZE88.26220,SD5.1750,--Pnt on Baseline
OC,OP1,N -5.1514,E 4.8516,EL0.0115,--RP
BK,OP1,BP0,BS316.42594,BC25.16100
LS,HI1.310,HR1.514
You are now ready to continue mapping your scene.