Electronic Bubble / Tilt Survey
GNSS Toolbar | Instrument Settings | Sensor Configure | Electronic Bubble
The Electronic Bubble utilizes MEMS sensors in the GNSS receiver to compensate for the antenna pole tilt.
This feature improves the GNSS point collection workflow by:
- Vertical and horizontal distance introduced by the pole tilt will be compensated automatically if desired.
- Eliminate the need to focus on the conventional bubble on the GNSS pole while taking measurements.
- Stop user from saving points if the pole tilt angle is greater than tolerance level.
The Electronic Bubble feature requires calibrations before being used in production works. With a supported GNSS receiver connected, Settings and Calibrations related to the Electronic Bubble can be located in the Settings | Sensor Configure | Electronic Bubble screen.

Settings
Electronic Bubble
Toggles Electronic Bubble feature ON/OFF
Tilt Compensated
Toggles tilt compensation ON/OFF
With tilt compensation turned on, tilt distance will be added into the calculation of GNSS measurements.
Tilt Rejection
Toggles tilt rejection ON/OFF
With tilt rejection turned on, user will not be able to store points if the tilt angle exceeds the specified rejection tolerance.
Tilt Rejection (Deg)
Tilt rejection tolerance in degrees. User can only store points if only the tilt angle is below the set limit.
Magnetic Declination
Specify the angle between magnetic north and true north
- Computed- Magnetic Declination is computed using International Geomagnetic Reference Field (IGRF-12) model.
- User - Enter a desired magnetic declination value.
Calibrate Sensors
Calibrate Tilt Sensors
This procedure calibrates the internal tilt sensor, and stores the zeroed the vertical angle.
- Click “Calibrate Tilt Sensors” button to enter the procedure.
- Level the GNSS receiver with a calibrated reference such as a bipod or tripod.
- Ensure the GNSS receiver is in a stable plumb position.
- Click “Calibrate” button to finish the tilt sensor calibration.
Note: Control panel on the GNSS receiver must be facing the operator when using the electronic bubble.
Calibrate Magnetic Sensors
This procedure calibrates the internal magnetic sensor.
- Click “Calibrate Magnetic Sensors” button to enter the procedure.
- Ensure the GNSS receiver is away from any artificial magnetic sources.
- Click “Calibrate” button to start the magnetic calibration.
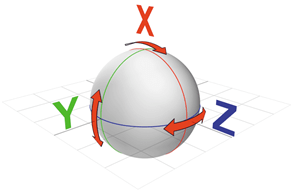
- Slowly rotate the GNSS receiver about its 3 axes to fill up the progress bar.
- Note that the progress bar will not move unless the instrument is being rotated.
This demonstrate the rotation axes:
- Longitudinal Axis (Roll)
- Lateral Axis (Pitch)
- Vertical Axis (Yaw)
We recommend to perform both calibration procedures on regular basis to ensure the reliability and accuracy of the Electronic Bubble. Magnetic Sensor may require more frequent calibration than tilt sensor depending on your calibration location and distance travelled. Consult with your GNSS receiver manufacture representative for more information regarding calibrate internals.
Settings
Electronic Bubble
After calibration, the electronic bubble can be found in two places.
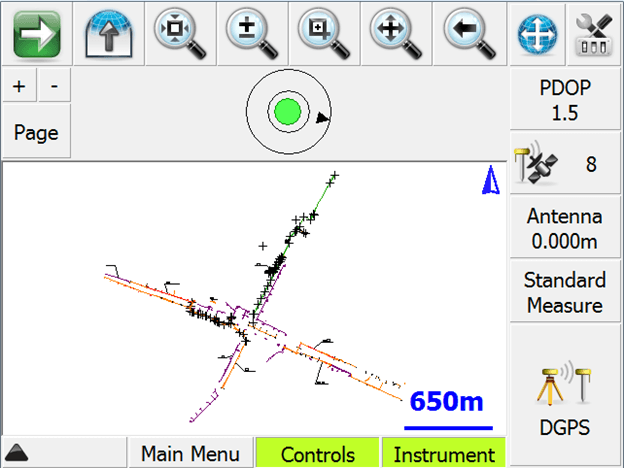
- Observation toolbar (One of the pages)
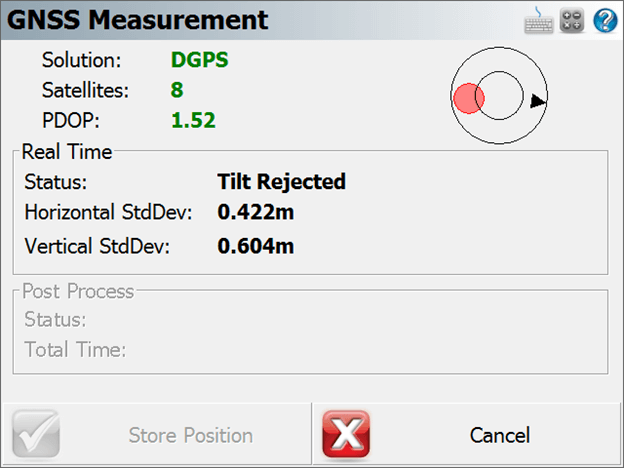
- GNSS Measurement screen
The black arrow shows the direction of magnetic north.
The bubble is green if the instrument is plumb, and red if the instrument is tilted beyond certain degree.
On the GNSS Measurement Screen, if the Tilt Rejection is turned on and current tilt angle exceeds the preset rejection value, the Store Position button will be deactivated and GNSS measurements will not be averaged until the GNSS receiver turns to a plumb and stable position.