Area Calculator
Main Menu | Calculations | Area Calculator
The area calculator is used to compute areas
When defining the boundary area, you can select points, lines and arcs from the map, or type the point numbers in manually. Lines and points from DXF files are also valid and can be selected using the Define Area toolbar.
Defining an Area
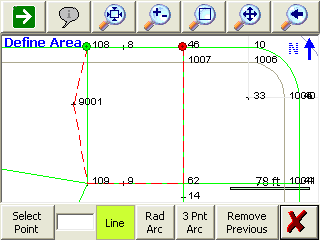
Define Area Toolbar (Points)
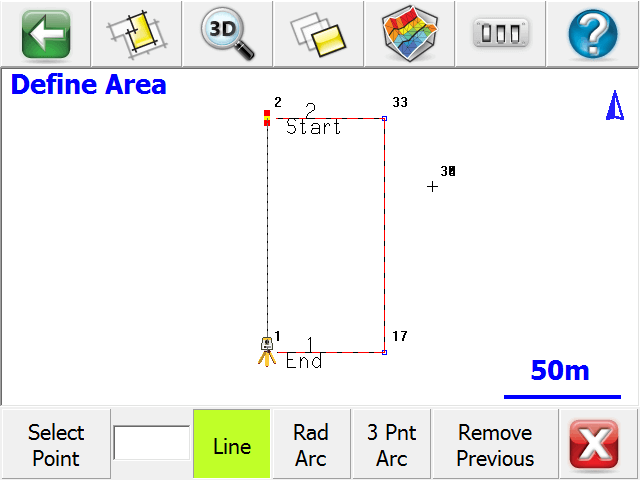
Select Point
The define area toolbar is used to help you define an area. If the first button is set to Select Point, the toolbar is in "point selection" mode and will only accept points picked from the map or point numbers that are typed in. This button acts as a toggle and will toggle between Select Point and Select Line.
Line
If you are defining a straight segment, then you should leave the Line button turned on. Simply select two points from the map, or enter the point numbers manually.
Rad Arc
Use this to define a curved segment where you know the start, radius, and end points. You need to first pick the start of the arc, then press the Rad Arc button to define the radius point. After doing so, the program will automatically switch back to the Line segment type which at that time you should select the end of the arc.
3 Pnt Arc
Use this to define a curved segment where you know three points on the arc. You need to first pick the start of the arc, then press the 3 Pnt Arc button which will allow you to define two more points on the arc for a total of three points. The program will automatically switch back to the Line segment type after the third point is selected.
Remove Previous
Use this to remove segments that were defined for the area boundary. This will remove the segments one at a time starting with the last segment that was defined.
Define Area Toolbar (Line)
Select Line
The define area toolbar is used to help you define an area. If the first button is set to Select Line, the toolbar is in "line selection" mode and will only accept lines picked from the map. This button acts as a toggle and will toggle between Select Point and Select Line.
Switch Direction
Since this routine accepts FieldGenius figures as well as DXF entities, at times you need to switch the direction of a DXF line so that it matches the direction that you are traversing around to define the area boundary. As you select lines from the map you will see a red marker appear at the end of the line.
Remove Previous
Use this to remove segments that were defined for the area boundary. This will remove the segments one at a time starting with the last segment that was defined.
Enclosed Area Calculation
To compute an area you need to

The green marker indicates the start of the area perimeter, whereas the red marker indicates the last point on the perimeter. When ready to compute the area, simple press the exit button (red X) on the Define Area toolbar.

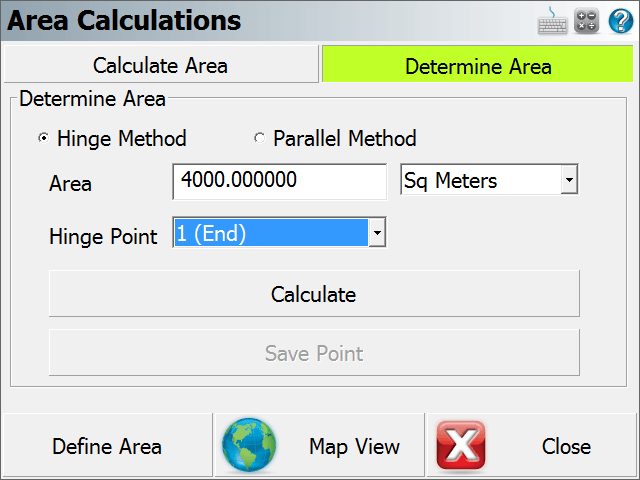
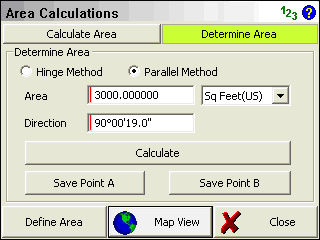
Determine Area (Predetermined)
FieldGenius can compute predetermined areas using the Hinge or Parallel Methods.
The Hinge Method allows you to specify a fixed point that the new boundary should hinge from.
The Parallel Method helps you compute the location of a new boundary using a user entered direction, usually parallel to one of the fixed sides.
Hinge Method
The first thing you need to do when using the hinge method is define the fixed sides of your boundary. Once you do this, on the determine area screen you can enter the predetermined area amount you want to compute a solution for, plus define what point is fixed and is to be used as the hinge point.
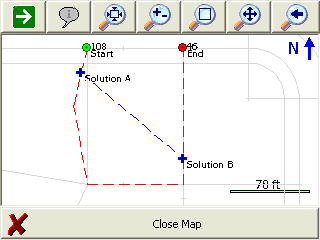
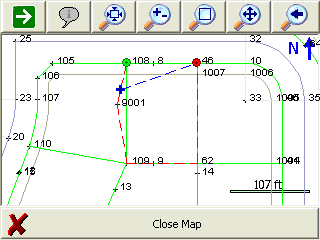
The start and finish points (markers) are represented using a green and red circle marker. You can always press world button on the Display toolbar which will place text labels next to the start and finish points.
FieldGenius will compute the new boundary so that it intersects the boundary segments connected to the start and finish points that were defined.
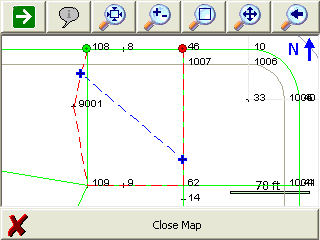
In the example below, the original left side of the lot now has two segments that define it. In this example, the solution would have to intersect the boundary segments from (108 - 9001). If we use the same predetermined area parameters as above, FieldGenius will not be able to compute a solution because the solution does not intersect the segment between (108 - 9001). It actually would intersect the line from (9001 – 109).

However if we increase the predetermined area amount from 10000 to 12000, a solution can be computed because the solution can now intersect the segment between point 108 and 9001. If you did want to use an amount of 10000, all you would need to do is change the start point from 108 to 9001.
Parallel Method
The first thing you need to do is define the fixed sides for your area. It is important to note that FieldGenius will try to compute the new boundary so that it intersects the segments connected to the start and finish points that you define.
The start and finish points (markers) are represented using a green and red circle marker. You can always press world button on the Display toolbar which will place text labels next to the start and finish points.

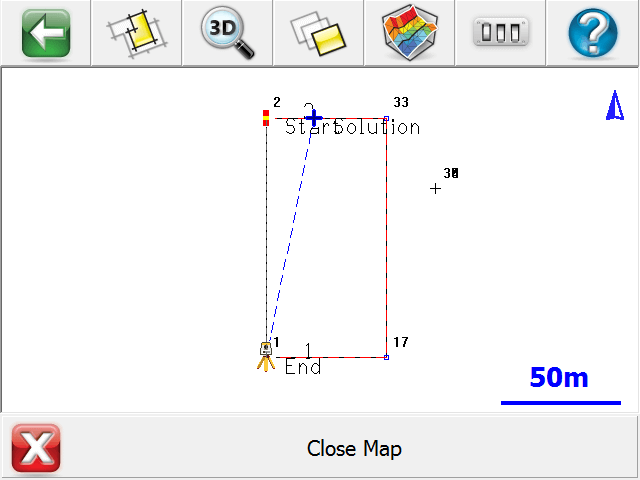
Once a solution has been found you can always preview it by pressing the Map View button.
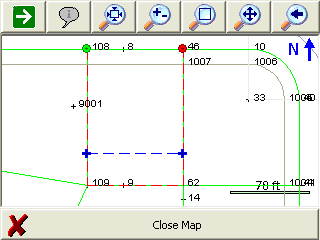
As mentioned above, FieldGenius will compute the new boundary so that it intersects the boundary lines connected to the start and finish points that were defined.
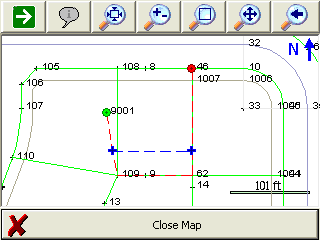
In the example below, the original left side of the lot now has two segments that define it. In this example, the solution would have to intersect the boundary segments from (108 - 9001) and from (46 - 62). If we use the same predetermine area parameters as above, FieldGenius will not be able to compute a solution because the solution does not intersect the two segments.
However if the direction for the boundary is changed to 130°, and the area amount changed to 7000, a solution can be computed because the solution intersects the two segments connected to the start and finish points.
If you did want to keep the same area amount and direction, all you would need to do is change the starting point.
Storing a Solution
When you have a solution that you want to store simply press the Save Point button or buttons depending on the solution method you used. If you used the parallel method you will have two solutions to choose from. You can switch to the Map view and turn the World button off if you want to see some temporary text labels next to the computed solution points.